
12 Best Christmas Tree Ribbon Ideas

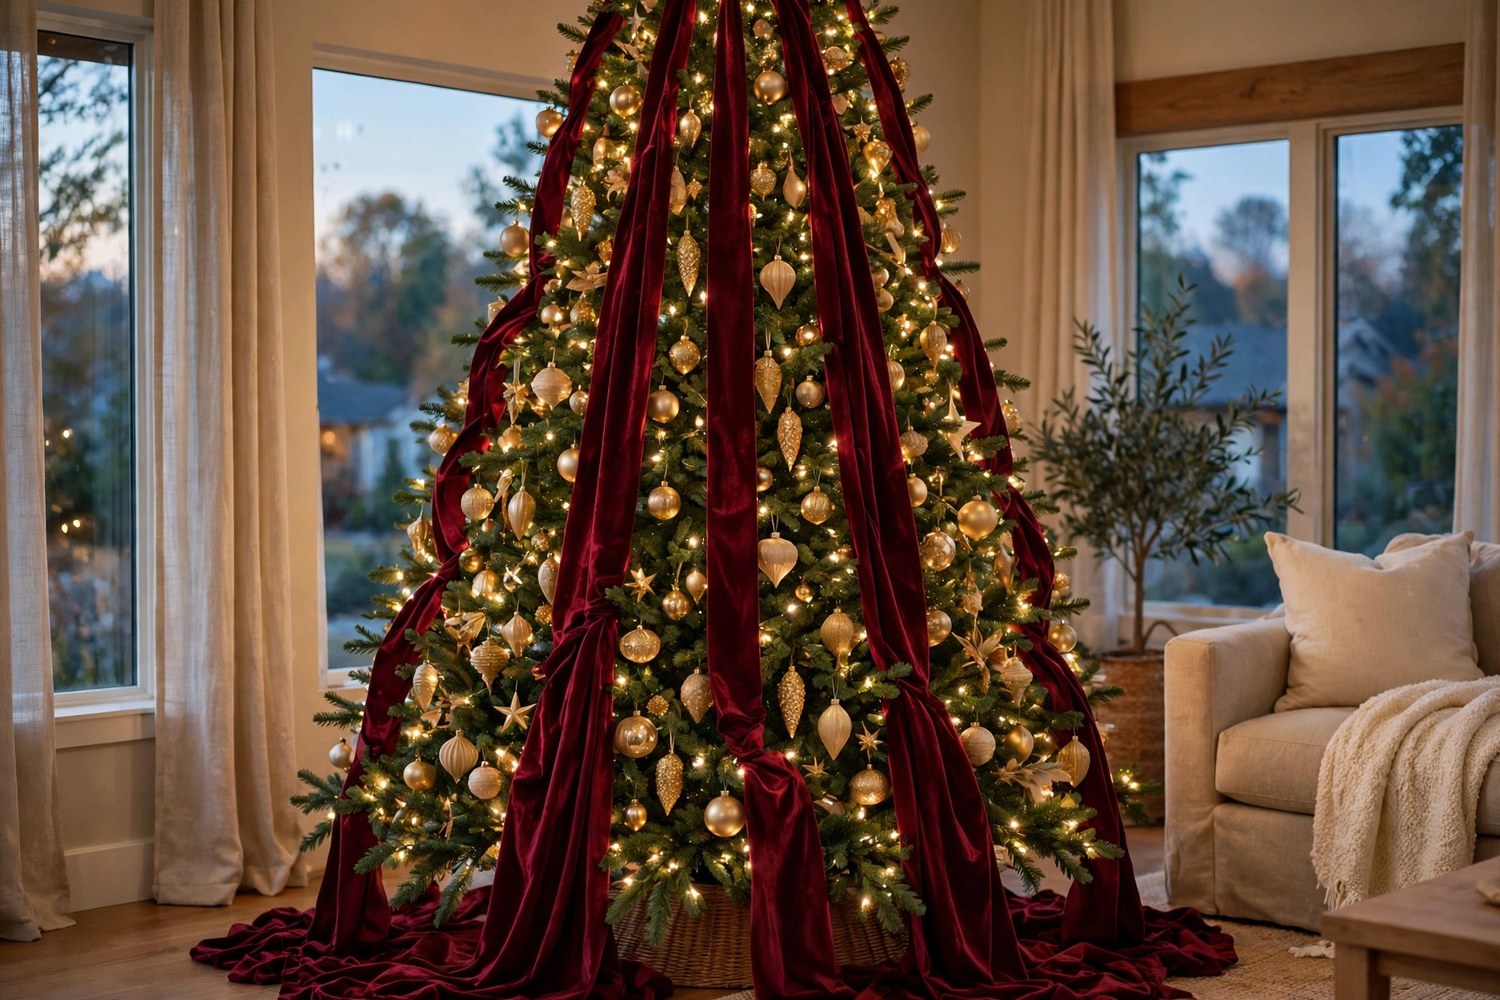
Ribbon is the hardest-working decoration on a Christmas tree, and also the one most likely to look like an afterthought. The difference between a tree that looks professionally styled and one that looks like ribbon was thrown at it rarely comes down to the ribbon itself. It comes down to technique: which ribbon you choose, how much of it you buy, whether you cut it or keep it whole, and how you persuade it to stay where you put it. Get those decisions right and even a plain tree with a modest ornament collection looks finished.
The 12 ideas below are all technique, organized in the order you will actually work: choose the ribbon, do the math, then drape it, wrap it, layer it, and finish it. They are written for full-size trees in the 6 to 9 foot range. If your whole house leans calmer than a ribbon-dressed showpiece, our simple Christmas decor ideas take the season in a quieter direction.
Key Takeaways
- Wired ribbon is the foundation: the thin wire in its edges is what lets loops, waves, and cascades hold their shape on the branches.
- Buy by the math: plan on roughly 2 to 3 yards of ribbon per foot of tree height for wraps and cascades, and check the length printed on every roll.
- The 2026 signature method is the waterfall — cut lengths of wired ribbon poured straight down the tree instead of wrapped around it.
- Depth is the professional tell: ribbon tucked into the branches at varied depths looks styled; ribbon pressed flat against the surface looks added on.
- Pick the ribbon first and let it set the tree’s palette. One repeated color is enough to make the whole tree look planned.
1. Start with Wired Ribbon: The Choice That Makes Every Technique Work
Nearly every method in this guide depends on one purchase decision: buy ribbon with wire in its edges. Wired ribbon has a thin wire running along each selvedge, and that wire is what lets you shape a loop, a wave, or a cascade and have it hold its position on the branches instead of slowly subsiding into a drape. It is the difference between a styled tree and a draped one, and it is why decorators treat wired ribbon as close to non-negotiable for trees.
Unwired ribbon still has two honest jobs. A soft unwired velvet or satin makes relaxed, flowing streamers and simple tied bows where gravity does the shaping, and narrow unwired ribbon is perfect for tying ornaments on (idea 12’s palette trick uses it). But for loops, billows, spirals, and cascades, unwired ribbon sags within hours. Within the wired family, choose by texture: velvet for depth and rich color, satin for a formal sheen, sheer for softness layered over a solid, burlap for a rustic weave, and the newly revived tinsel-fringe wired ribbon when you want sparkle without loose tinsel everywhere.

Tip: Test a roll in the store by shaping a quick loop with your fingers. Good wired ribbon holds a crisp curve when you let go; ribbon that springs flat or creases like paper will fight you on the tree.
2. Match the Width to the Tree: 2.5 to 4 Inches Does the Heavy Lifting
Width is proportion, and proportion is what makes ribbon read as intentional. On a full-size tree, the working range is 2.5 to 4 inches wide. Ribbon narrower than that disappears into the branches and reads as string; ribbon much wider overwhelms all but the largest trees and becomes hard to tuck neatly. A 4-inch ribbon makes broad, sculptural sweeps and is the right lead ribbon for a 7.5 to 9 foot tree. A 2.5-inch ribbon is the versatile middle — wide enough to see from across the room, nimble enough to weave.
Narrow ribbon, 1 to 2 inches, is an accent player rather than a lead: it layers over a wide ribbon, ties bows at branch tips, and threads through the tree as a fine line of contrast color. Match the width to the ornaments, too — wide ribbon beside large ornaments looks balanced, while dainty ribbon next to oversized baubles vanishes. When in doubt, buy the wider roll: a wide ribbon can be gathered and pinched down visually, but a narrow one cannot be made to look bigger.

Tip: Hold a strip of the ribbon against the tree from across the room before committing. If you cannot clearly see it from the doorway, it is too narrow to lead.
3. Do the Yardage Math Before You Buy a Single Roll
Running out of ribbon mid-tree is the most common ribbon failure, and it is entirely preventable with thirty seconds of arithmetic. The decorator shortcut used by the tree-trimming experts at St. Nick’s Christmas & Collectibles is to plan on 2 to 3 yards of ribbon per foot of tree height for a wrapped or cascading look. A 7.5-foot tree at the generous end comes to roughly 22 yards, which is why their guideline of about seven rolls of wide ribbon for a 7 to 7.5 foot tree lands where it does.
Then check the length printed on each roll, because rolls are not standardized: 10 feet is common, designer ribbons can run as short as 5 feet, and some solids come in 50-foot rolls. Buy one roll more than the math says — leftovers tie the gift wrap together. Budget separately for bows: about 1 yard for a single-loop medium bow, 3 yards for a three-loop bow, more for long tails. The table below gathers the numbers in one place.

Tip: Decide your method before you shop. Cascades and wraps eat yardage; a bow-only tree needs far less. The method sets the math, not the other way around.
4. Cut First — or Keep It in One Piece: The Two Ways to Work
Before any ribbon touches the tree, you have a strategic choice most tutorials skip. Working with cut lengths — cutting the roll into separate pieces, typically 2.5 to 5 feet each — gives you total control. Each piece is placed independently, so a mistake costs one piece, not the whole tree, and pieces can be reused in different spots next year. This is the method behind the waterfall, billow, and weave techniques that follow, and it is far more forgiving for beginners.
Working uncut, with one continuous length, suits the classic spiral wrap (idea 8), where an unbroken line is the point. It uses ribbon efficiently and never shows a seam, but it is harder to adjust: shifting a section means unwinding everything above it. Whichever way you work, finish cut ends properly. Fold the last half-inch under and tuck it into the branches, or cut a fishtail — a shallow V notch — into the end. A raw, straight-cut end left visible is the single detail that most often makes ribbon work look homemade.

Tip: Cut with sharp fabric scissors in one clean stroke. Sawing at wired ribbon frays the weave and bends the wire, and a ragged edge cannot be rescued by tucking.
5. Pour It Down: The Vertical Waterfall Cascade
The signature ribbon method of 2026 skips wrapping altogether. Instead of circling the tree, ribbon pours straight down it in loose vertical waterfalls, as highlighted in Decorfern’s 2026 Christmas tree trends: cut wired ribbon into lengths of roughly 3 to 5 feet, tuck the top of each length into the branches near the crown, and let it twist gently downward, pinning it in two or three spots as it falls. The vertical lines make the tree look taller, and the look photographs beautifully.
Work around the tree placing waterfalls at uneven intervals — closer together where the tree is sparse, wider apart where branches are full. Stagger the starting heights slightly so the falls do not begin on one tidy ring; a perfect grid makes ribbon look mechanical. Three rolls are plenty for a full, expensive-looking effect on a standard tree, because each fall covers a long vertical run. Let the falls end at different lengths too, some finishing mid-tree, some reaching toward the base.
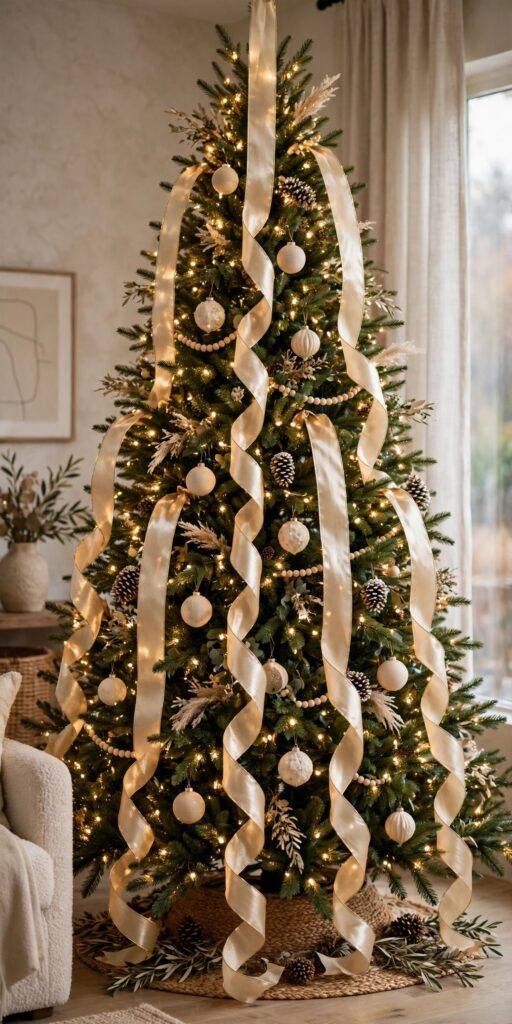
Tip: Give each waterfall one gentle twist as it descends, so the ribbon shows both its face and its edge on the way down. That alternating flash of surface is what makes a cascade shimmer.
6. Billow and Tuck: Short Lengths, Big Soft Loops
If the waterfall is a pour, the billow is a puff. Cut wired ribbon into short lengths of about 2.5 feet. Hook one end of a length onto a branch near the top of the tree, then let the ribbon bow outward in a generous curve before pinching the middle and tucking that pinch deep between two branches. Tuck the far end in the same way, lower down. The slack between the two tucks billows out away from the tree in a soft, full loop.
Repeat down the tree in a loose zig-zag, starting each new length just below where the last one ended, until the ribbon reads as a chain of plump loops wandering down the branches. This is the easiest method to learn because every length is independent: if one billow looks wrong, you pull out one piece, not the whole design. Billows also do double duty as gap coverage — a loop puffed out at the right spot hides a bare patch more convincingly than an ornament can, because it sits at branch depth rather than hanging on the surface.

Tip: Resist matching the billows. Loops that are all the same size and spacing look stamped out; vary the puff and the drop, and the tree looks gathered rather than manufactured.
7. Weave It In and Out: The Diagonal Pass Through the Branches
Weaving is the technique behind the polished, professional finish on designer trees. Instead of lying on the surface, the ribbon travels through the tree: in over one branch, deep toward the trunk, out again two branches later, moving diagonally as it descends. Cut wide wired ribbon — at least 2.5 inches — into lengths of about 3 feet for control, and work each piece through the branches so roughly half of it disappears into the tree’s interior.
That depth is the entire point. Ribbon that lives at different depths catches light differently as you move around the room, and the eye reads the tree as layered and rich instead of decorated on the outside only. Diagonal lines also draw the eye around the whole tree rather than straight down, which flatters round, full trees. Keep the weave loose as you go: you are threading, not lacing, and the ribbon should never bend a branch out of its natural line. Step back after every few pieces — weaving covers ground quickly and is easy to overdo on one side.

Tip: Weave ribbon before the ornaments go on, always. Ornaments hung afterward sit in front of the ribbon’s deep sections and complete the layered effect; ribbon threaded around existing ornaments just tangles.
8. Wrap the Classic Spiral — Loosely, and Tucked Deep
The spiral wrap is the oldest ribbon method and still the right one for a traditional tree — provided it is done loosely. The failure version is familiar: ribbon wound tight around the outside like a corset, compressing the branches and banding the tree into stripes. The fix is to treat the spiral as a path the ribbon wanders along, not a binding. Anchor the end at the back of the top, then work downward in a diagonal spiral, letting the ribbon drift in and out of the branches as it circles.
Tuck a twist of ribbon into the branches roughly every foot, and pinch it gently there, so the wrap holds without tension. Aim for even vertical spacing between passes — about 6 to 8 inches apart is a good working rhythm on a full-size tree — and let the ribbon billow slightly outward between tucks rather than hugging the silhouette. Working uncut (idea 4) suits this method best. When you reach the base, tuck the end deep under the lowest branches where the tree collar or skirt hides it completely.

Tip: Judge a spiral from the doorway, not from beside the tree. Banding that is invisible up close shows instantly from across the room — and the doorway view is the one your guests get.
9. Let It Fall from the Topper: Streamers That Start at the Crown
Whatever topper you use — a star, an angel, a finial — the branches directly beneath it are prime ribbon territory. Anchor two or three long streamers of wired ribbon just under the topper, hidden by it, and let the tails fall in long, loose curves down through the top third of the tree. The streamers connect the crown to the body of the tree, so the topper stops looking placed on and starts looking grown into the design.
Cut the streamers long enough to trail well into the branches, and finish their ends with a fishtail V-cut (idea 4) — these ends are meant to be seen, so they need to look tailored. Angle the tails in slightly different directions rather than letting them hang in parallel lines, and give each one a soft wave with your fingers so it falls in curves, not straight drops. Keep the count modest: two or three streamers read as elegance, while a fountain of them turns the crown into a maypole. A single streamer ribbon in a contrast finish — a narrow metallic over a wide velvet cascade — is a quiet way to preview the layering idea that follows.

Tip: Wire the streamer tops to the trunk itself, not to a branch tip. The crown gets bumped during decorating, and streamers anchored to the trunk survive it.
10. Skip the Garland: Ribbon Can Do the Garland’s Job
A garland’s real jobs are three: carry color around the tree, fill gaps between branches, and give the eye a path to travel. Ribbon does all three, which is why many styled trees now skip garland entirely — ribbon and garland both circling the tree compete, and the tree gets busy. If your ribbon is wide and generously applied, especially with the billow method (idea 6), let it stand alone and spend the garland money on one better roll.
For sparse trees that genuinely need interior filling, borrow the decorator’s accent-mesh trick: wide, open-weave mesh ribbon worked in loose poufs deep inside the branches, at roughly three rolls for a 7.5-foot tree, builds a colored interior the ornaments then decorate over. Treat the mesh as structure, not surface — it should glow from inside the tree rather than sit on it. One honest exception: a slim tree with a single fine garland, such as beads, can still take ribbon streamers at the crown without crowding, because the two live at different scales.

Tip: Decide garland-or-ribbon before you start, not halfway down the tree. Removing a garland after the ribbon is woven means undoing both, and ribbon rarely survives the untangling gracefully.
11. Wire Bows into the Bare Spots
Every tree has them: the thin patch where branches never filled in, the awkward gap beside the trunk, the spot an ornament would hang in lonely isolation. A bow is the right filler, because it is wide, soft, and sits at branch depth. Tie simple bows from wired ribbon — the wire is what keeps the loops plump all season — and wire each bow directly onto a branch inside the gap, rather than hanging it from a tip where it will spin and sag.
Size them on a gradient: the largest bows up high and through the middle where the gaps are biggest, smaller ones toward the edges and base. Eight to twelve bows will carry a full-size tree. Keep every bow in the same ribbon, or at most the same ribbon in two widths; a tree dotted with bows in four patterns looks like a gift-wrap accident. Bows are also the fastest seasonal refresh there is — last year’s tree with this year’s bows in a new color is, to every guest, a new tree.

Tip: Make all the bows at the table before you start placing them, loops shaped and tails trimmed. Judging bow size is far easier when you can hold two side by side.
12. Let the Ribbon Set the Palette: Color and Pattern Strategy
Here is the sequencing secret behind cohesive trees: pick the ribbon first, before you open the ornament boxes, and let it set the palette everything else answers to. The ribbon does not need to match everything on the tree — it needs to agree with it, and one repeated color between ribbon and ornaments is usually enough to make the whole tree look planned. If your ornament collection already has a strong personality, reverse the order and choose a ribbon that repeats one or two of its colors.
For 2026, the fresh direction is earthy: terracotta and chocolate-brown velvets, sage greens, copper and warm gold accents, with the neon brights of a few years ago firmly out. Classic red-and-gold and icy silver-and-white remain safe, beautiful choices. Two guardrails keep any palette tidy. Use at most one patterned ribbon per tree — a plaid or a print leads, solids support — and cap the total at three ribbon styles, keeping one clearly dominant. A final flourish: swap standard metal ornament hooks for narrow ribbon loops in your palette colors, and even the way ornaments hang joins the scheme.

Tip: Photograph your ribbon choices next to the tree in daylight before buying in quantity. Velvet and satin shift dramatically under warm evening light, and the camera shows the clash your eyes excuse.
Christmas Tree Ribbon at a Glance: Width and Yardage by Tree Size
| Tree height | Lead ribbon width | Yards for wraps and cascades | Approximate rolls* |
|---|---|---|---|
| 6 feet | 2.5–4 inches | 12–18 yards | 4–6 rolls |
| 7.5 feet | 2.5–4 inches | 15–22 yards | 5–7 rolls |
| 9 feet | 4 inches | 18–27 yards | 6–9 rolls |
*Roll counts assume common 10-foot rolls; always check the length printed on the roll, since designer ribbons can run as short as 5 feet. Yardage follows the 2 to 3 yards per foot of tree height shortcut and covers a generously dressed tree; a bow-only tree needs far less — about 1 yard per medium bow. Narrow 1 to 2 inch accent ribbon is additional: roughly 4 to 6 rolls accents a 7.5-foot tree.
Frequently Asked Questions
How much ribbon do I need for a 7-foot Christmas tree?
Plan on 2 to 3 yards per foot of tree height for wraps and cascades, so a 7-foot tree takes roughly 14 to 21 yards — about five to seven standard 10-foot rolls of wide ribbon. Check the length on every roll before buying, add one extra roll as insurance, and budget bow yardage separately if you plan a lot of bows.
Does ribbon go on before or after the ornaments?
After the lights and before the ornaments — that order matters. Shaping ribbon against open branches is far easier, the ends and anchor points tuck deep into the tree, and the ornaments hung afterward hide every tuck and wire. If the ribbon placement looks wrong, fix it before a single ornament goes on.
Can I use unwired ribbon on a Christmas tree?
Yes, in the jobs where gravity does the shaping: soft streamers falling from the topper, simple tied bows, and narrow loops for hanging ornaments. For loops, billows, spirals, and cascades that must hold a sculpted shape, unwired ribbon sags and flattens within hours — wired ribbon is the right tool there.
How do I keep ribbon from looking flat or too tight?
Work in depth, not on the surface. Tuck a twist of ribbon into the branches roughly every foot, let it billow outward between tucks, and vary how deep it sits so some passes float near the tips and others disappear toward the trunk. Never pull ribbon taut around the tree; a tight wrap compresses branches into a banded, corseted look.
Can I reuse tree ribbon next year?
Usually, yes — wired ribbon reshapes well. Smooth each piece out, roll it back onto its spool or around a piece of cardboard, and store it flat and dry with the decorations. Pieces that are past their prime on the tree still earn their keep as gift-wrap ribbon and package bows.
Final Thoughts
Ribbon rewards technique far more than spending. Choose wired ribbon in the right width, do the yardage math before you shop, pick one main method — a waterfall, a billow, a weave, a loose spiral — and let the bows, streamers, and layers support it rather than compete. Then step back to the doorway, look at the tree the way your guests will, and adjust once. That is the whole craft: a few good decisions, made in the right order, and a tree that looks like you meant every inch of it.